
Biomechanics Of A Tennis Serve
In this page we look at the technique for the basic tennis serve. The technique of the basic tennis serve form the foundation for the different types of serves such as the kick serve and slice serve. We will use still images of Andy Roddick’s serve to illustrate the different steps. Refer to the image with the corresponding number as you go through the steps.
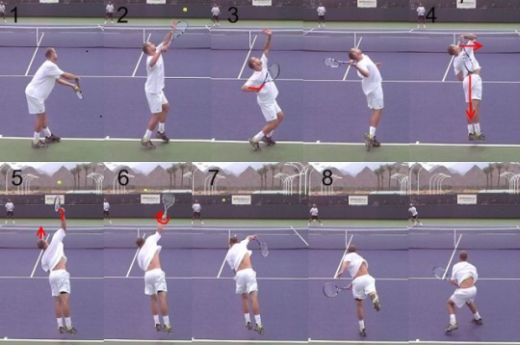
The Party Stance (Image 1)
Stand with both feet comfortably apart (about shoulder width). The front foot should be about 45 degrees to the baseline. The back foot should be about parallel to the baseline. Try to hold the ball mostly with your fingers (not the palm) as this helps you to toss the ball with minimum spin on the tennis serve.
The Toss (Image 2)
Hold the ball in your fingers. Bring the tossing arm down and then raise it. Keep the arm as straight as possible. Release the ball about the top of your head. Try to toss the ball with minimum spin. The hand with the racket is also raised with the racket head pointing upwards. The tossing hand continues to rise after the ball is released.
You need to toss the ball about one to two feet above the contact point between the ball and the racket. For a flat server toss the ball just in front of the body in line with your hitting arm shoulder.
Trophy Pose (Image 3)
When you complete the toss, with the backswing of the racket and the knee bend in unison, you end up in the trophy pose. The toss was discussed in step 2 above. The backswing and knee bend are discussed below. Note that when you are trying to get to the Trophy Pose your arms go down together as you move your weight to the back foot and the arms go up together when you move your weight towards the court with the knee bend. At this pose your hitting arm shoulder is lower than your tossing arm shoulder. The weight should be equally distributed on the balls of both feet. Try to time the ball toss so that the ball is at its highest point when you hit the trophy pose.
Backswing
On the backswing of the tennis serve, the hitting arm comes down to point the racket butt to the floor. Raise the racket until the racket and the hitting arm almost form an L (the L position) as shown in image 3. The hitting shoulder should be below the other shoulder and both the racket and the hitting arm point towards the sky.
Knee bend
First bring the body weight to the back foot. Then while tossing the ball rock weight toward the court while starting to bend your knees. Bend knees fully to coincide with the L position of the racket and hitting arm.
Racket Drop/Leg Push (Image 4)
The Racket Drop and Leg Push happen together.
Racket Drop
Drop the racket behind your back until the racket head is pointing towards the ground (scratch back position) as shown in image 4. The elbow goes up. Tossing arm comes down. When the racket drop is complete the shoulders should be level and you should be facing the side fence (be sideways to the net) as shown by the direction of Roddick’s head in image 4.
Leg Push
From the trophy pose you push with your legs. When the racket has completed its drop pointing towards the court your legs should be fully extended and you should be on your toes or just above the ground as Roddick shows in image 4.
Swing to Contact (Image 5)
Swing up to the ball with the edge of the frame as shown in image 5. Get to the position where your racket and your hitting arm form an L as shown in this image. At this position it will seem as if you are going to hit the ball with the frame. Then turn your wrist and open the racket face to meet the ball as you continue the swing. This turning of your wrist is called pronation. Pronation is an important but often neglected aspect of the server that adds power. This is because pronation adds racket rotational energy to the ball. Since you are swinging the racket at a very high speed this rotational energy that is transferred to the ball can be significant.
During the swing to contact the ball the body rotates from being sideways to the net at racket drop, to facing the net when the ball strikes the strings, as shown by the direction of Roddick’s head in image 5.
Follow Through (Image 6 to 8)
Continue pronation after hitting the ball as shown by the direction in which the wrist turns in image 6. Bring the racket arm down so that the racket head points to the court on the same side as your hitting arm as in image 7 of Roddick’s tennis serve. Land on your front foot (left foot if you are right handed). The back foot should kick up and face the back fence for balance as in image 8. Continue the rackets motion by taking it to the side of the tossing arms and back towards the back fence to complete the tennis serve follow through as in image 8.
Andy Roddick’s Serve in Slow Motion
Andy Roddick Serve’s The Fastest Serve Ever By A Tennis Player